Sunday, February 28, 2010

St Patty's Day Layout - Day 1

Here is the first day of the St. Patrick’s Layout.

Step 1 - Cut the "Day1Background.svg" and ink the edges. If you have a Create cut both background files and tape in the middle. We will be layering lots of items on this layout so the cut will not be noticed in the end.


Step 2 - Cut the file named "Day1PiecesBehindShamrocks.svg" and tape to the back of the background.


Step 3 - Adhere background to a 12 x 12 paper.


For 12 x 12 Expression Version Click Here to DOWNLOAD.

For 12 x 6 Create Version Click Here to DOWNLOAD.

Stop by tomorrow for Day 2 elements!

Saturday, February 27, 2010

St. Patty's Day Layout - Want to play along?

Instead of creating a bunch of St. Patty's Day SVGs thought I would focus on one nice layout. Over the course of 5 days I will build the layout and give you step by step directions along with the SVGs that you can cut in SCAL or MTC.

Here is a sneak peek of some of the elements:

Stop by tomorrow for Day 1 files.

Thursday, February 25, 2010

Origami Flowers

I tried a new technique on the layout I posted yesterday ~
Origami Flowers.
Now I am hooked!


Jana Eubank, my favorite designer featured these on her blog. With Jana's permission I created a SVG to make the cutting and folding process go a bit quicker. Here are the instructions from Jana's blog.


NOTES:
~ I did not include the score lines from Step 10 as these would show on the final flower.

~ The file does take some time to cut, about 5 minutes, if this is too long for you just trim/score by hand.

~ If you don't have SCAL or MTC just follow the instructions and trim/score by hand.

~ Don't forget to embellish the middle with brads or buttons.

Please leave me a comment or send me an email if you have questions.


CLICK HERE TO DOWNLOAD the SVG and Instructions.

Wednesday, February 24, 2010

Bo Bunny Abbey Road Layout

I received my design team assignment from my local scrapbook store, The Crop Shop. Bo Bunny - Abbey Road. I love Bo Bunny and checked out the line on their site. I discovered the Bo Bunny blog that features awesome projects and challenges.

Here is a Sketch Challenge taking place:


Here is my Abbey Road Layout:

~ LEFT SIDE ~


~ RIGHT SIDE ~


~ CLOSE UPS ~


Circle elements are from Accent Essentials and font is Plantin Schoolbook.
Embellishments from Creative Charms.

Stop by tomorrow for details on the Origami Flowers.
I tried these for the first time on this layout and now I am hooked!

Monday, February 22, 2010

Dustin Pike Girly Dragon Challenge

Dustin Pike's Challenge Blog has a Girly Dragon Challenge. I just started out with the digital stamps and really need some of those Copic Markers. Unfortunately my two sided Prisma Color Markers from art school are all dried up!

On Dustin's other site I came across a FREE SVG of the baby dragon. Ever get a file or collection (like the ones from SVG Cuts) where you just can't wait to cut it? Well that was the case. I downloaded and created this card this morning!

Here is the cut dragon:


And here it is on the card:


Go grab the SVG and give it a try!

Saturday, February 20, 2010

Bo Bunny Card Challenge

I love Bo Bunny papers and decided to try out their Card Challenge.
The challenge was to use the following color palette: Red • Pink • Aqua

I wanted to make a card for my sister-in-law's mom and she loves to quilt. She is so talented and can whip up gorgeous quilts in a few days.

Here is the quilt block:


And here is the card:


Bo Bunny Papers used:
Wild Berry Red Dot • Bashful Dot
Alissa Spunky • Delilah Stripe • Abbey Road

I thought I'd do a quilt block pattern. This is called the log cabin. I created a SVG in Adobe Illustrator and used SCAL (Sure Cuts Alot) to cut the pattern. I machine stitched the paper and applied it to the card. I don't think I would have ever picked this color combo but they do look interested together.


If you would like to try the SVG in SCAL or Make The Cut click here to DOWNLOAD.
Please note: Along with the SVG I've also included a JPG that shows the stitching for this type of quilt. You will only need the JPG as a reference.

Hmmm...maybe there are other quilt patterns that I can convert. Let me know if you like this and I'll make more!


Thursday, February 18, 2010

Split Negative Challenge - JUGS

When I saw the challenge for JUGS (Just Us Girls) I knew I wanted to jump in on this one. I created this wall hanging for a friend of mine. She is expecting her first baby.


This is a split negative technique I used.


Here are the details:

Step 1 - I stamped one side of the butterfly swirlies. Black on white paper.


Step 2 - Scanned in and took into Photoshop. Under Image-Adjustment-Curves I dragged the points to opposite corners to create the look of white stamps on black paper. I then Flipped the Canvas Horizontal of the initial scan to get the mirror image. Printed both out.


Step 3 - Created the butterfly image and cut out of chipboard (cereal box) on the Cricut. Mounted the printouts to this and inked the edges.


Step 4 - Since I already had the stamped images digitally I placed those in Illustrator and created the cutouts around the stamped areas using the pen tool.


Step 5 - I cut the plain black and white paper using the butterfly with the cutouts and also cut a chipboard version. I spray glued the white and black paper to the chipboard for the top layer. Inked the edges.


Step 6 - I added some dimensional tape to the back of the top layer and applied to the bottom layer. Added the center of the butterfly.

Step 7 - Added embellishments from Creative Charms and a ribbon to hang it. I hand wrote a special note on the back using a white pen.


Please send me an email or leave a comment if you'd like more details. My tutorial is just the basics but hope it helps. It really was a fun project and I'm sure I'll be using this technique again!

Wednesday, February 17, 2010

Artist Owl Card

I created this card for a 10 year old girl named Delia. She lives in Colorado and is undergoing treatment for leukemia. If you are interested in sending her a card visit Dustin Pike's site for some free digis and all the info.

She loves owls and art so hopefully this little guy will brighten her day a bit.
I included a quote about art and inside told her about how art has touched my life.


I discovered a cool site to get quotes, check it out here.


If you like the palette and paint splatters and want the SVG click here to DOWNLOAD.


Tuesday, February 16, 2010

Another Baby Name Collage

Here is another Baby Name Collage for a little girl named Alivia (love the name!). Her room is green with a farm theme. Check out her room & her cute lamb rug...


Here are some detail shots of the collage featuring Creative Charms embellishments:


And here is the final collage. Added some pink in since she's a girl! The area at the right will hold a photo of the new baby.


I used a bunch of SVG Cuts files for this:

Little Lamb - Cuddly Animals Collection

Scalloped Frame - Winter Bliss Collection

Flowers (Dots on i's) - 3D Mums and Fall Flowers

Scallop Border - Freebie from 11/18/09
(I cut this on the Cricut then cut it in two sections -
used the scallops on top an the other section on the bottom)


Sunday, February 14, 2010

Happy Valentine's Day!

Have you seen Bingo cards on scrapbook pages and cards? They are a cute addition and decided to make my own in Illustrator, save as a SVG and cut with SCAL (Sure Cuts Alot) on the Cricut.

You can do any combination of paper. Good news - there is very little paper piecing. Bad news - lots of weeding and little scraps to discard. But I think it is worth the effort!


If you'd like the SVG click here to DOWNLOAD.
Please note: For best quality - do not cut smaller than the file size supplied.

Hope you like!

Friday, February 12, 2010

Another Idea for the House

Sorry I have not been around lately. We got 30 inches of snow, power outages, and I've been sick :( My boys and husband have been off school all week so we've been hanging out and watching movies and building puzzles.

Wanted to share this awesome project that Katherine made using my small box SVG. Here are a few photos of her exploding box and she put the house box inside. It is a congrats for a new house.


Check out Katherine's blog here for additional photos.

Hope to be back to crafting and posting soon!

Sunday, February 7, 2010

An Apple A Day...SVG

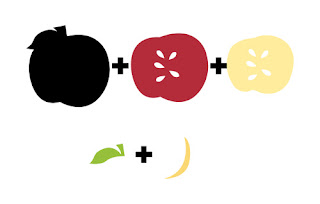
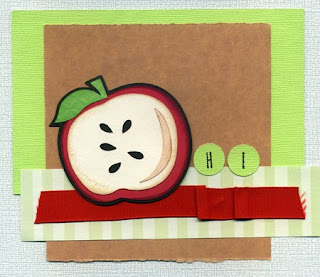
Someone over on the Craft Edge Forum was looking for an apple cut in half so I made it in Illustrator, cut it, inked it and created a card.

Here are the elements:
Here is the card:

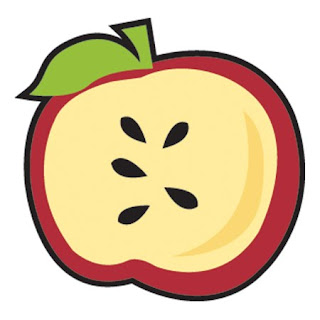
Here is an image of the apple:

Cool thing about this apple - no paper piecing the seeds! It is designed to layer on top of the black and the seeds show thru.

If you'd like the SVG click here to DOWNLOAD.
I've included a JPG of the apple in the ZIP file so you can see the piecing. Just import the SVG into SCAL or MTC and you are good to go.